
Irridescent fridges test ideas
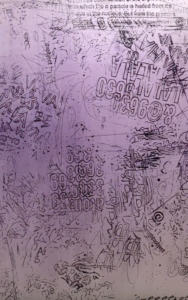
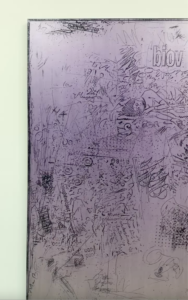
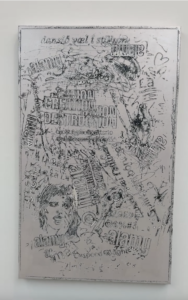
Rannva Kunoy’s Athiatl x4
and David Hammons’ Untitled 1975
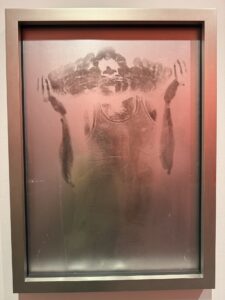

both use surface effects that read as subtle, luminous, and layered rather than simply metallic glitter.
To achieve something similar across an entire canvas background: materials, technique and the pigments.
READING:
https://goldenartistcolors.com/search?query=interference
READING:
Mieczysław Knut Subiektywny Podręcznik Malarstwa Akrylowego, 2025 (“A Subjective Handbook of Acrylic Painting”)
Surface Preparation & Iridescent Background Technique
(Fridge Door – White or Silver Base)
Even if cleaned and sanded, paint adhesion may fail without proper priming.
1. Essential Surface Preparation
• Degreasing (Critical Step)
2. Remove invisible residues:
• Isopropyl alcohol
• Acetone (use with ventilation)
3. Surface Keying
Create microscopic tooth:
• Sandpaper: 400–600 grit
• Aim for matte finish (not deep scratches)
Remove dust completely after sanding.
4. Adhesion Primer (Non-Negotiable)
Apply suitable primer:
• Etching primer
• Metal primer
• Multi-surface primer
5. Recommended products (search examples):
• Zinsser Bulls Eye 1-2-3
• Zinsser Cover Stain
• Automotive Etch Primer
Why this step matters:
• Acrylic alone may peel from enamel/metal
• Primer ensures long-term stability
6. Choosing Your Base Surface
White Fridge Door
7. Recommended Materials
• Iridescent / Interference Colours
Look for:
• Golden Fluid Acrylic Interference Colours
• Liquitex Professional Interference / Iridescent
Suggested shades:
• Interference Gold
• Interference Blue
• Interference Violet
• Iridescent Pearl
Medium / Binder
For smooth dispersion:
• Golden Soft Gel Gloss
• Liquitex Soft Gel Gloss
Optional additives:
• Golden GAC 500
• Liquitex Flow Aid
8. Suggested Mixing Ratio
Starting formula:
• 70% Soft Gel Gloss
• 25% Interference / Iridescent Colour
• 5% Flow Aid
Notes:
• Mix slowly
• Avoid introducing bubbles
9. Application Techniques
Best Tools
• Wide soft synthetic brush
• Foam roller (recommended for uniformity)
• Silicone / rubber spreader (for leveling effects)
Layering Strategy
• Apply very thin coats
• Allow full drying between layers
• Build multiple layers for depth
Thin layers produce:
• Optical complexity
• Smooth reflective surface
• Subtle chromatic shifts
10. Optional Aesthetic Variations
• Hammons-Like Atmospheric Surface
• Transparent grey glazes
• Interference layers between washes
• Minimal texture buildup
⸻
• Kunoy-Like Chromatic Softness
• Interference over white base
• Slight pigment density variation
• Controlled unevenness
⸻
• Enhanced Reflective Vibration
(On silver base)
• Ultra-thin interference glazes
• Semi-transparent layers
• Avoid thick gel application
11. What to Avoid
• Heavy texture gels
• Thick impasto layers
• Large mica flakes / glitter
• Skipping primer
• Sanding interference layers
12. Drying & Curing
• Dry fully between coats
• Allow several days curing before sealing
Metal/enamel surfaces may feel slower to cure.
13. Final Seal (Optional)
For protection and visual unity:
• Acrylic spray varnish
• Gloss → enhances luminosity
• Satin → soft sheen
• Matte → subdued effect